5-Day Kitchen Cabinet Spraying Process
We are good at Kitchen Cabinet Refinishing & Painting
Day 1
Space Prep & Paint Station Setup
We start by preparing both the kitchen and a dedicated painting area to make sure the entire job runs smoothly and cleanly.
First, we clear out all the cabinets—every plate, cup, and crumb gets removed. Countertops and appliances are covered with plastic sheets or heavy-duty drop cloths. Floors are also protected with rosin paper or canvas runners to guard against spills or scratches. We tape off all surfaces that shouldn’t get painted, like walls, backsplashes, and adjacent trim. Painter’s tape goes around cabinet frames, hinges, and outlet covers. We unplug or cover any exposed electrical areas in the workspace. All hardware, knobs, and hinges are removed and stored in labeled bags or containers. Every cabinet piece is labeled clearly, so reassembly later is painless. We then sweep and vacuum around the kitchen to remove dust and debris. Dust in the air = dust in the paint, so this step’s non-negotiable. Next, we set up the paint station, ideally in a garage, workshop, or ventilated outdoor space. This space is cleared of anything that might interfere with painting. A large table is covered with drop cloths or old sheets. We set up a fan to keep air moving and fumes to a minimum. Ventilation helps paint dry faster and keeps things safer. A drying rack is built using two sawhorses and a couple of 2x4s or a pre-made shelf system. We screw in hooks or use painter’s pyramids to hold pieces upright while they dry. All tools—brushes, rollers, screwdrivers, rags, buckets—are laid out and ready to go. The goal is to create an efficient zone where we don’t waste time running back and forth. Once the space is prepped, we’re ready to start working for real.


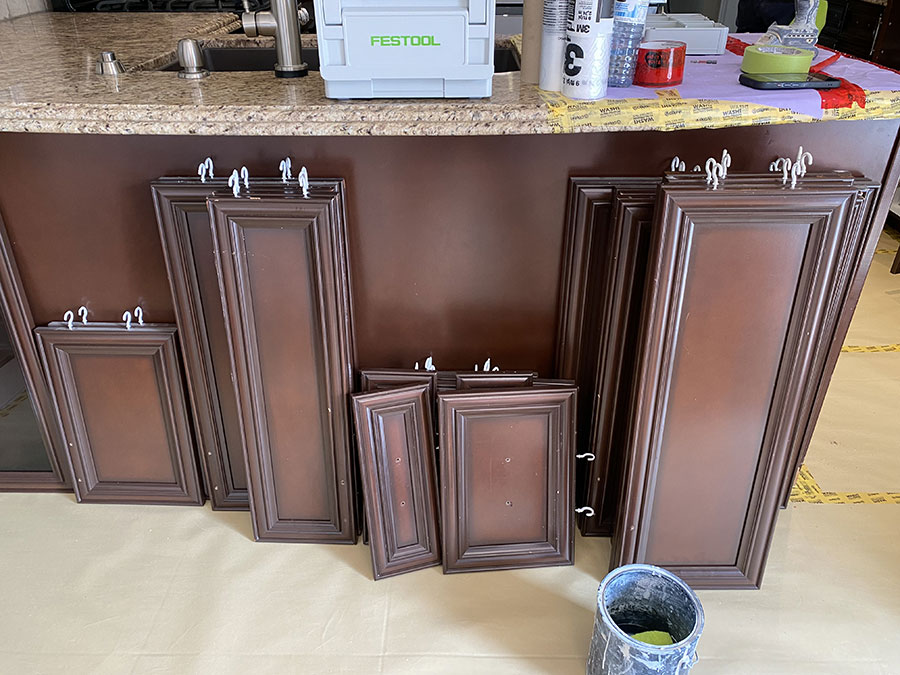
Day 2
Disassembly & Degreasing
We remove all cabinet components and deep-clean every surface to make sure nothing gets in the way of a solid paint job.
We use a drill or screwdriver to take off each door, drawer front, shelf, and hinge. Everything is carefully handled to avoid damage. Each piece is labeled using painter’s tape and a Sharpie—usually a number or letter that corresponds to a cabinet location. This prevents confusion later when it’s time to reinstall. All screws, knobs, and handles are sorted and bagged individually to avoid losing any parts. We then inspect each piece for damage, like splinters, cracks, or peeling layers. Before anything gets paint, it must be grease-free. Kitchens are full of hidden grease, and even invisible residue can mess up your finish. We apply a degreaser to all surfaces—doors, boxes, drawers—using clean, lint-free rags. The degreaser is scrubbed in thoroughly, especially around handles and cooking zones. We wipe off excess and let everything dry completely. If any area still feels slick, we hit it again. Clean surfaces help primer and paint stick properly, making them last longer. Neglecting this step often leads to early peeling or uneven coverage. Once dry, we do a visual check under good lighting to ensure nothing was missed. If needed, we use fine steel wool or a scrub sponge for stubborn spots. Edges, corners, and the tops of cabinets often need extra attention. A second vacuum or tack cloth pass removes any last particles. Now we’re ready to move to priming with clean, dry surfaces.


3.
Priming
We apply primer to every cabinet component to ensure proper adhesion and a smooth finish for the top coat.
We start by checking that all surfaces are clean and fully dry. Using either a brush, roller, or sprayer (depending on the piece), we apply a high-adhesion bonding primer. For wood cabinets, we often use an oil-based or shellac-based primer for durability. We apply primer in the direction of the wood grain to prevent marks or ridges. Frames and cabinet boxes are primed in place first. Then we move on to doors, drawer fronts, and shelves, working in the paint station. Each piece is laid flat to prevent drips and sagging. We keep layers thin to allow faster, more even drying. If we spot any bleed-through from stains or previous finishes, we apply a second primer coat to seal them in. While the primer dries (typically 1–4 hours depending on type), we clean and prep our tools. Once dry, we lightly sand all primed surfaces using fine-grit sandpaper or a sanding sponge. This removes any raised grain or imperfections and improves paint adhesion. Sanding dust is wiped down using a tack cloth or microfiber cloth. We inspect each surface again for cracks, dents, or gaps. Wood filler is used to patch imperfections; caulk is applied along seams where cabinets meet walls. After the filler and caulk dry, we sand and wipe again. Any glossy or slick patches get a quick scuff to rough them up. Priming is the backbone of the entire paint job—done right, it locks everything together. When complete, we have smooth, sealed surfaces that are ready for paint.


4.
Spray-Painting
We apply two coats of premium paint to all cabinet surfaces, bringing them to life with a durable, professional finish.
We begin by double-checking that all primed areas are clean and dust-free. We select the correct paint based on finish and durability—typically a high-quality acrylic latex or alkyd hybrid. The first coat is applied using a high-density foam roller or fine brush to minimize brush marks. We work methodically across the cabinet boxes, following the direction of the grain. Doors, shelves, and drawers are painted separately in the designated work zone. Each piece is laid flat or hung on drying racks for even drying. We watch carefully for drips along edges and corners, smoothing them out immediately. Paint is applied in thin, even coats to avoid texture buildup. Once the first coat dries (usually 4–6 hours), we inspect for missed spots or inconsistencies. A light sanding with fine grit ensures a smooth second coat. The second coat is then applied, again in the direction of the wood grain. This final coat brings out the richness of the color and ensures a uniform appearance. We avoid overworking the paint—brushing too much can leave lines or streaks. Each painted piece is left to dry in a dust-free area with good air circulation. Fans help, but we avoid direct airflow to prevent debris from landing in the finish. Once dry to the touch, we inspect every surface under light for defects. If necessary, touch-ups are done with a fine brush. At this point, everything should look fresh, smooth, and evenly coated. We let the pieces cure for at least 24 hours before reinstalling.


5.
Reassembly & Cleanup
We reinstall all cabinet parts, clean the workspace, and put the finishing touches on your freshly painted kitchen.
We begin by ensuring all painted components are fully cured and ready to handle. Starting with the cabinet boxes, we remove painter’s tape and carefully check for any edge touch-ups. We then reinstall hinges, starting with the upper doors and moving down. Labeled doors and drawer fronts are matched to their original positions. We use padded surfaces and soft gloves to avoid scratches during reinstallation. Hardware—knobs, pulls, handles—is added back, often replaced with updated styles if the client prefers. Drawer slides and shelf pins are inspected and adjusted as needed. Once the structure is back together, we do a full function test: open/close every door and drawer to check alignment. Any sticking or misalignment is corrected immediately. We wipe down all painted surfaces with a dry microfiber cloth to remove dust. Countertops are uncovered and cleaned. Floors are vacuumed and wiped down. Trash, plastic sheets, and drop cloths are removed from the space. All tools are packed up and checked to ensure nothing is left behind. A final walk-through is done to spot any paint imperfections or missed hardware. If needed, we do quick final touch-ups with a fine brush. The client is invited to inspect the work and give feedback. At this point, the kitchen is fully functional, fresh, and dramatically improved in appearance. It’s the kind of transformation that makes people wonder why they didn’t do it sooner.


